Creative Jumpstart 2021

Creative Jumpstart 2021
Join me for the 10th Anniversary of CJS2021

Thursday, July 31

I'll use anything to Paint

I will USE anything that has color -- as long as I like the colors to paint my stamped or drawn images. I love color. AMEN. And really, what's not to like about all the Spray Inks out there?

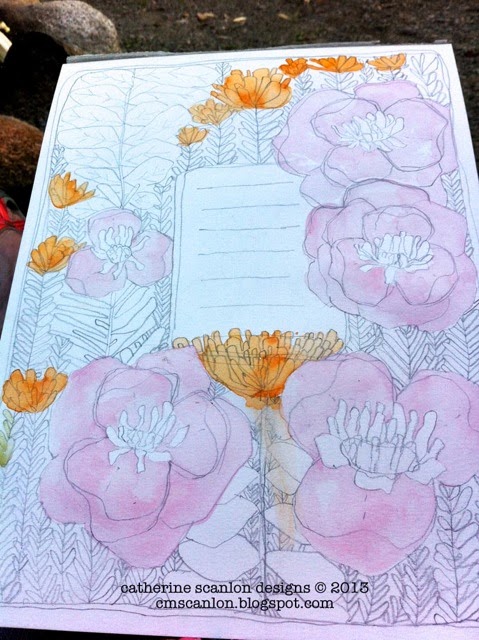
I start my paintings and art journals pretty much the same way - I draw a design on watercolor or Mixed Media paper using a pencil. When I'm satisfied with the results I start painting. I try not to be real sketchy but use strong, determined lines. I don't usually pick the colors first -- but sometimes I will pull out some pretty colors I might like to work with. It's a hit or miss though -- I just use what I'm drawn to.

When I am painting with spray inks I work with the top off of one color at a time -- to prevent accidents. I'm pretty accident prone and spills on the coffee table aren't on the top of my fun list at midnight -- LoL! So to start, I take the cover off of the jar and put the sprayer in my water bucket and dip my paintbrush right into the jar of ink. I can mix up the spray with my brush or choose to use just the color on the top.
I start every painting -- PRETTY MUCH this is a rule of mine -- by painting the background. This helps me isolate my designs and make them pop forward.

Then I start layering the colors for the focal points - which just so happens to be poppies on this one. I start with the lighter colors first and build to the brighter and darker colors -- making sure to leave some areas light.
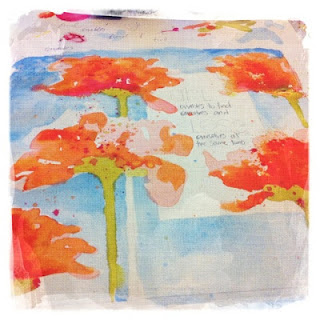
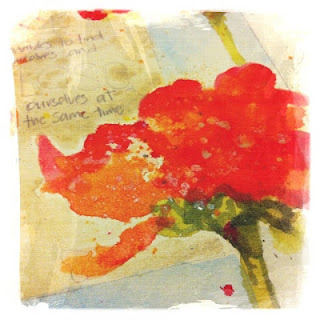
You can see how that works -- layering light then darker and darker -- really gives the look of traditional watercolors AND creates a dynamic and textural painting.

NOTE: I always test the colors out on a part of the paper that will be cut off or won't show to see how they look before I use them. Sometimes they look a little different than what I had in mind and I throw them back and choose a different color.

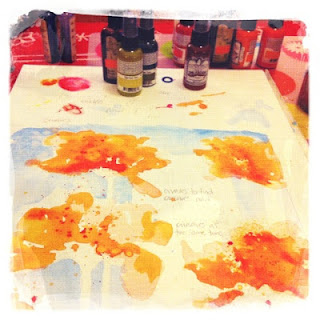
I just keep layering and splattering and maybe a little spritz here and there to liven things up.

Once the flowers are done I add the greens
 
I also used some Glaze and splattered it here and there to create some lovely glistenings of water. 

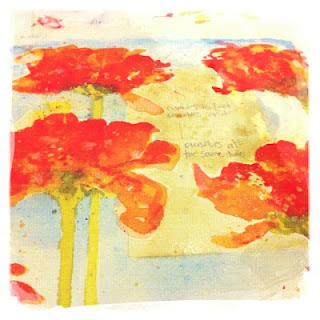
When that's done I add some browns here and there and in the part where the quote will go to tone some of the colors down.
Before you know it the color is done. Now it just needs to DRY completely.
When it's dry I go in with a black pen and add the details marks.


Sometimes, but not in this case -- I'll add texture with colored pencils or watercolor crayons. Just to liven things up and add more texture.
That's pretty much it.


Then, when it's done you have a beautiful piece of art that you can frame and enjoy!

Thanks for stopping by today -- gave a GREAT day! 

Wednesday, July 30

Ch-Ch-Ch-Changes

Since the beginning of the year I've not been happy with a few things -- but my main complaint was none of my clothes fit. In January I went to California for a trade show and really struggled with finding clothes in my closet that looked professional and weren't busting at the seams.

Same thing when I went to North Carolina at the beginning of June.


It's hard to make changes to the way one lives -- especially when that one likes to cook and is a good one. I finally decided on June 8th when I didn't have one pair of shorts to wear that enough was enough and I started tracking my food and weighed myself.

I'm happy to say that the daily practice of tracking my food to see how many calories I eat has been successful and I've been able to shed about 15 pounds.

You might be wondering what worked? Well -- holding myself accountable to write down the food, find out how many calories are in each serving I eat and stay away from junk as much as possible. I also found a dry eraser pen and wrote down my weight on my bathroom mirror every time I weighed myself -- having to write the ups as well as the downs has kept me accountable to myself.

If I can do it -- I know you can too! Thanks for dropping by today - enjoy your day!

Monday, July 28

Fast and Easy Cards!

What do you do when you are short on time, have forgotten you need a birthday card -- and can't get to the store to buy one...not to mention that buying cards makes you feel guilty because you have a studio FULL of supplies to make cards?? Well, you look through your supplies until you find something you LOVE (like the Cherry Blossom Vellum stickers shown here) and make a card. I will say I spent more time LOOKING at my supplies than making this card, LOL.


Here's a side-ish view so you can see the dimension, LOVE dimension!

And a close-up of the tag. Lately I've really been into making little tags for cards and things.


Thanks for stopping by, have a great day!

Friday, July 25

I always have flowers on my mind!

I've been so busy making art and art journaling, preparing new designs and samples (that I love by the way) for classes that I haven't taken any time to make art for myself. It's easy to loose sight of why I do this -- because I love it -- and get  bogged down in the  other details.
I've been creating art for so long that people recognize my style --  I've been thinking a lot about re-making or giving my art a face lift. I want to be unique. I want my art to look unique and something other people aren't doing.
I certainly didn't do that in this piece, but it sure was fun cutting, pasting, painting, spraying and image transfering on this piece. I did it on 200lb. watercolor paper, so it's really sturdy and could handle all the abuse it put it through. What I've known for some time, but realized for certain while working on this piece --  I'm definitely not a whimsical artist, I think that's why I don't like this. But, we must first explore, play and experiment with new techniques, supplies and styles before we can discover our true style, don't you think?
So with that, I must get back to work on finishing up my class for Friday! Have a great day and thanks for stopping by.

Wednesday, July 23

Teaching Weekend at Kept Creations!

I'm so happy to say that I'm going back to Kept Creations in Whitman, Mass this weekend for THREE Amazing classes. 

Friday Night we'll make this Fabric Gelli Sampler, with fabric and a little of this and a lot of that -- click on the image to register -- this one is almost full so don't wait if you are interested!

http://www.keptcreations.com/event/fabric-gelli-sampler-with-guest-catherine-scanlon-45/


Saturday Morning I'm teaching this 6" x 8" Wood Soar Panel.  There's room for you and a friend or two in this one.


And Saturday afternoon after a quick break for lunch and a few laughs we'll start the headliner -- this Personal Art Statement (or whatever statement you want to make) 12 x 12 Stretched Canvas. the more the merrier -- so sign up now while there's still space! There's room for you and a friend or two in this one too.

 http://www.keptcreations.com/event/catherine-scanlon-returns/ 

Feel free to call Kept Creations (781-447-4010) if you have any questions -- or post a comment here with your email address and I will reply to you privately! 

Thanks for dropping by - stay cool and enjoy your day!

Tuesday, July 22

White Pens!

One of the biggest challenges I had when I first started journaling was when I wanted to add text to my pages using an ink color other than black or brown. White pens like sharpies, gel and painty pens just didn't give me the look or quality I wanted.

Up to that point I had been playing around a lot in my journals with my Speedball dip (calligraphy pen) pen using only black ink. On a trip to the art store to get more black india ink I noticed they had red, white, blue and  A LOT of other colors.

So, I picked up a bottle of the red and white to experiment with. I am so happy I did, as the white ink looks great on darker pages, and the red is REALLY vibrant -- I used the red on the veins of the flowers on this page. The pen I use is a speedball dip pen with a 512 tip.

If you haven't tried a dip pen, they are really inexpensive, have interchangeable tips and are fun to experiment with. You should try one today! I do like using a Pitt Pen on my pages too -- but recently read that there is a chemical in the paint that can damage the tip of the pen....hmmmm not that they are expensive to replace -- but I want to use up all the ink before the tip dies, so I think I will probably stick with my dip pen for writing on acrylic paint on my art journal pages for now.

Hope you have a great weekend, thanks for stopping by and do something artful today -- it's the perfect time of year to settle into some great artsy routines!

Friday, July 18

I love colored pencils!

Colored Pencils or Watercolor Pencils? How about both? In this Project  Life card I created using my Art Gone Wild Stamps I layered analagous colors (colors that are next to each other on the color wheel) using my  Caran D'Ache colored pencils to create the rich colors of the flower.

For example, take a look at the center of the flower. See how it looks dimensional even though it's not. To get this effect I colored the center of the flower with a light yellow colored pencil and then layered darker shades of yellow and yellow-orange and finally orange on top to create that look.


I used the same technique using pinks for the petals and greens for the leaves. In the background I switched over to watercolor pencils. The original intention was to use a water brush to smooth out the pencil lines for a true mixed media look but I liked the way it looked so I decided to leave it.

In the example below, Live Simply -- I did just that. The mix of bright colors from the colored pencils and watery fluid look from the blue in the background creates a truly unique look!


Thanks for dropping by today!

Tuesday, July 15

the Whatevers Two - The End Has Come


It's with great sadness that I share my post with you -- we've decided that this will be the last of the Whatevers Two.  It's been a super fun 2-Year Project and I really enjoyed cutting loose and writing some really silly stories to go along with my adopted family. I'm so thankful that Nat asked me to play along on this creative and fun project. As with anything, we've all gotten quite busy with other projects and commitments and we've decided it's time to end our creative story telling to do other fun and creative things!

So, check out the other stories here:
  • In case you are new to the Whatevers, you may want to read my previous stories from Round 2 here: 
And here is my FINAL story, I hope it's not a cliff hanger for you!
_______________________________________________

He couldn't believe his eyes. Newton was dumbfounded as he watched the events of the day unfold before him. How could that have happened?


It was supposed to have been an Olympic Class Ocean Liner, able to transport 3500 people from one continent to another. What had happened to the rest of his family? Did they drown? Were they able to get on one of the few life-boats available?

After several months of waiting, he finally gave up hope that they would ever return.


Newton felt so alone and abandoned. He wished he had gone with his family instead of having to stay home with his mean old governess. He also felt thankful that he had met his half-brother and half-sister before the Titanic sank leaving him with no living relatives.


Even though he didn't like them, they could come for birthdays and holidays so they could celebrate together.

He was also thankful that father had worked for a company that had provided him with a large life insurance policy and large settlement after his long months of captivity. At least Newton would be able to stay in the large castle in Germany with the governess to take care of him. . . forever.


_______________________________________________
Here is how it works
  • Vicki, Cat, Cuchy (Carmen), Martha and I and I have made a one-year commitment to each other and picked twelve photos with Whatevers whom we will give a story.
  • Every month – if possible always on the 15th –  each of us will do a post with an individual story that goes along for us with the same photo.
  • If you want you can play along and we will have the photo for you to download and show us your version of The Whatevers. The photo will be posted at the end of our blogposts- not on Facebook!
  • There are no rules to the story itself- it can be funny, sad, uplifting, breathtaking- WHATEVER
    There are no rules on the length or the form of the story- it can be a short sentence, an essay, a poem or a soap opera – WHATEVER
  • There are no rules on the art form you choose – it can be a scrapbook layout, an altered art project, an art journal page – WHATEVER
  • Here is a rule though: if you take the photo you have to link back to us and show us your story.
     
  • These pictures are from our personal stash and are for personal use for you only! If you want to use them for a publication whether a book or magazine in print or digital form please ask for permission

    Monday, July 14

    Camping + Art Journaling!

    We went camping over the weekend to one of my favorite places in Maine. The Rangeley Lakes area is -- well to me anyway -- one of the most beautiful places on this earth! Right now the wild lupines are blooming -- purple, light and dark pink and even white -- everywhere along the side of the road.

    Maine Lupines by Catherine Scanlon cmscanlon.blogspot.com

    I can't count how many photos I took of them -- I even caught a great one with a bumblebee collecting some honey. This photo though, was my favorite. A little thunderstorm had passed through leaving some fog and a wet table -- it's perfect! I'm always looking for inspiration for art.

    Since it rained quite a bit while we were there -- and I was the ONLY girl with 3 men -- 2 of them teenage boys -- I brought my art journal box with me and created 2 great journal pages.

    Art Journal by Catherine Scanlon cmscanlon.blogspot.com

    I always have paintbrushes, paint -- distress paints are the perfect size for traveling, markers, colored pencils, watercolor pencils and paper whenever I leave home for a few days. Just in case I need them.

    Art Journal Page by Catherine Scanlon cmscanlon.blogspot.com

    Plus, it's a great thing to do in front of the camp fire! 
     Now I just need to find a quote for this one -- and let it air out because it smells a little bit like camp fire smoke :-D

    Thanks for stopping by -- have a great day.

    Friday, July 11

    Please don't take my Pencil away!

    My Illustration class at Maine College of Art is almost over -- just 1 week left -- which makes me sad BTW - but looking forward to taking more classes. It's been a good rut-buster and I've learned lots of interesting ways to try new things, bust out and go in a new direction. While a lot of these aren't that great, I wanted to share and encourage you to take classes. If you are an artist, writer -- or whatever it is that you do -- taking classes to promote learning is great for growth as well as knowledge. Plus, it's plain old fun.

    Last week the classroom assignment was to paint bones -- but we couldn't use a pencil or makes lines of any kind. I chose watercolor crayons and this was my scribble pallet. I scribbled the color on paper and added water -- then I had nice little spots of  color. At the end of class I closed up my drawing pad "palette" and left for the day.


    Yesterday I decided to use my pen and a paintbrush to make something of the color blobs. It was fun. I see 2 dogs, a horse, a snail, lots of flowers, a face, an upside down heart, turtle, a mitton, oyster and snake head. Do you see anything?

    My on-going struggle in this class is saying good-bye to my pencil. Using a pencil is not allowed and I rely heavily on it. I'm getting there, this one and the other flowers following was pencil-free. Are they great?? No, but a gal has got to start somewhere!


    In this assignment we had to draw a mish-mash of items and create a little scene. It was fun, but again, not using a pencil kills me. Below is a homework -- draw 50 things around your house. It was fun, look Ma -- no pencil.

    Another free drawing image from class, I find I'm always adding text to my drawings -- or in this case pen and ink sketch. Yup, no pencil.
     Above and below are the bone drawings. The one above is a goat skull but it started looking like a dog taking a nap so I went with it. Below is a vertebrae, not sure what animal -- but it looks like a cow head the way I'm holding it in my hand. I like the thought of holding a mini-cow in my hands so added them as well. This is one of my favorite painting from the class -- and YES YES YES I know you are wondering -- NO PENCIL.

    This next assignment was fun. We had weird comic sketches that we needed to use as inspiration pieces and come up with something using a limited palette. My sketch was of two weird animals walking on the earth with three trees, three clouds, and bubbles for their conversation. This is what I came up with, my second favorite from the class.

    Yesterday we had more fun inspiration pieces and this time we had to design a product advertisement or packaging for a fun product. My phone kind of makes fun of how we are so addicted to our phones, going to a therapist or counselor and also coffee. You can replace that with an app for your phone that will give you a 220 jolt of energy. That was a LOT of fun -- and yup -- I giggled a lot as I came up with the text.

    So, that's it for my illustration class for today. THANKS for stopping by and have a WONDERFUL day!

    Wednesday, July 9

    Make a tissue paper Flower!

    I love how serendipitous (the faculty of making fortunate discoveries by accident) things happen -- like this sweet birthday card I created on a wood panel with tissue paper flowers!

    I thought I'd share some quick instructions to make the pretty carnations if you want to give it a shot! 

    You will want to grab some tissue paper and the pretty Flowers #3 set from Stephanie Barnard.
    Fold the tissue paper so you have at least 20 layers and use your Big Shot to cut them out. 
    The stack of tissue paper flowers will look a lot like this when they come right out of the die. 
    You really want them to look like this. I re-stacked about 10 of the tissue paper flowers into a random pile like this.

     
     I used some cotton pearl and a needle to sew one single stitch in the center of the stack. You'll want to tie a knot on the backside to keep them together and leave the tail about 3" long.
     
    Next just crunch them up to make your carnation. 
     
    To add some color, spritz with your favorite spray ink, I used Cherry Cola Chalkboard from Tattered Angels.

    If you want to make your flower look like a bud, wrap some floral tape around the bottom and extend it down the tail a little bit and trim the tail off.

    Then you can use hot glue or any type of glue you like to to attach them to your project.
     
    Supplies I used for this project:
    • Sizzix: Flowers #3 657901, Majestic #658693, Baroque #656633
    • My Mind's Eye Madison Avenue Lost and Found 6x6 Pad: MAD6x6
    • Stampendous Cling Carnation: CRP186
    • Tim Holtz Stick Pin
    • Claudine Hellmuth Studio Paints - Pink
    • Hug Snug Pale Pink Seam Binding, Martha Stewart Pink/Gold Ribbon
    • Canvas Corp.: 7 Gypsies Tissue Paper, Cherry Cola Chalkboard Spray
    • Other: Vintage Paper Doily, Watercolor Paints, Foam Tape, Hot Glue Gun, Black StazOn
    Thanks for dropping by today, have a great day!