Creative Jumpstart 2021

Creative Jumpstart 2021
Join me for the 10th Anniversary of CJS2021

Monday, March 30

Ideas that won't go away!

Have you ever had an idea that you just can't stop thinking about? I have, and I find it maddening until I get the time, the technique or the supplies to work it out.


Right now I'm trying to figure out how to poster print an image from Photoshop and frankly, I'm struggling. And the idea that I need the image for -- it's just burning my brain out -- a regular old creative storm -- until I can get the darn image printed so I can go forward. I need to get this thing figured out so I can see if my idea will work.

PS. the image on this page has nothing to do with poster printing, but I had to keep you guessing. THANKS for dropping by, have a great day....and if you have any suggestions for printing -- please let me know.

Saturday, March 28

You Are Loved

Sharing another journal page where I combined my stamps with a Tamara LaPorte stencil to create a unique and colorful page. This stamp is from the Art Gone Wild Winter, 2015 Release -- you can find the daisy stamp here, in my Etsy shop.


To create this page I stamped the daisy cling rubber stamp 2 times, but at different heights and added color with Deco Art Media Fluid Acrylics and a few tiny details with a Sakura Gelly Roll pen.

The Tamara Laporte stencils are so lovely to incorporate on a journal page. I think I need to practice my cursive!

Have a great day, thanks for dropping by.

Thursday, March 26

Before and After

I love to share my work on Instagram -- but don't always find the time to share it here, so today I thought I would.

This page started out with some stamped designs from my Late 2014 Stamp Release with Art Gone Wild on the bottom of the page, I used black Archival Ink and stamped the flower stamp 2 times across the bottom, changing the angle each time. (click on the link to see the set I used in my Etsy shop.)


I drew in some leaves and border lines to connect the elements and frame the page and added some journaling with my funky lettering style. The word "beautiful" at the top of the page started out with an Artist Cellar stencil from Tamara Laporte that I traced with a pencil and then connected the letters with a marker. 


For color I used a combination of colored pencils and Tombow Dual Tipped Brush Markers and a final touch was to add some shadowing to the letters with a platinum grey pen, and voila -- completed page. Super easy and very relaxing to work on while watching TV.

THANKS for dropping by today, have a great day!

Tuesday, March 24

Thinking of Spring


I had a fun couple in the studio last weekend for a watercolor painting class and this was the little samples I painted -- and it reminded me how much I love to paint. Wish I spent more time making sweet sketches like this!

Happy day, hopefully spring will be here soon.

Wednesday, March 18

Here comes the sun...

Last Friday I had a fun group of young ladies in the studio for the afternoon and we created this fun collage. They really loved putting down the paintbrush and collaging the papers on with their hands.


I can't wait for the group that are going to visit this Friday! Thanks for dropping by, have a great day!

Monday, March 16

Planning.....

Good morning friends and Happy Monday. Thought I'd share how my completed sample painting turned out from my trip to Massachusetts last month.

http://www.merrymeetingarthouse.com/event/paint-night-700pm-1000pm/

I've just added this as a Paint Night class at my Brunswick, Maine studio for March 27th -- check out the class details HERE and sign up soon, space is limited!

Wednesday, March 11

Merrymeeting Art House Goes on the Road, Part 2

The second class I taught in Abington, Massachusetts a few weeks ago was my Guided Painting class. It's like a Paint Night, only it's not. My process really quite different and each artist can interpret my instructions when we start and put their own spin on the completed painting.


Look at these beautiful paintings, they all had so much fun!


Beth was so fun, and she did great considering she had had a complete shoulder replacement a few weeks prior.


And my friend Kathie, she's always so fun and inspiring.


The whole group was a lot of fun and enjoyed the process. Everyone finished their paintings and went home to hang them on the wall. It was a great weekend, and so rewarding in so many ways.

If you'd like to schedule a Guided Painting class with me, leave me a comment with your email address and I'll respond asap! 

THANKS for dropping by, have a lovely week!

Monday, March 9

Dreams in Black + White

Last week I shared a project in my Instagram feed and had quite a lot of requests for a how-to post - so here it is.

I started out with a piece of Strathmore 140 lb. Mixed Media Paper, a Black Media Mister from DecoArt and a white opaque pen from Recollections.


The first step is to spray the entire sheet of paper with the Media Mister. I used black because I love the contrast of the dark background with the white ink, but you can use any combination of colors.


I sprayed 2 coats and let them dry completely in between coats before moving on to the next step.


Here's a great tip for you: it's important to remove the nozzle from the Media Mister bottle and clean it when you are done spraying for the day or session. If I'm not going to be spraying for half an hour or so I'll clean between applications.

The nozzle easily pops off the bottle and I take it to the sink and run cold water over it. When the water runs clean I blow air threw it (with my mouth, like I'm blowing up a balloon) to remove any residual paint from the nozzle. This absolutely keeps it from clogging the next time you want to use it.


When the black paint is dry I use a light pencil to draw a design on the paper.


And then I use the White Opaque Pen from Recollections and trace over my pencil lines.


This page was simple and easy to create, but super fun to watch the design come out on the black - and it has a HUGE wow factor. The next thing I'm going to do is experiment with colored pencils to add some color to my design and see how they cover over the black.

Thanks for dropping by, have a great WEEK!

Saturday, March 7

Merrymeeting Art House Goes on the Road, Part 1

A few weekends ago I took Merrymeeting Art House on the road and taught two GREAT workshops in Abington, Massachusetts. The first workshop was my Positivity Journal.


I had a fun group of ladies that were interested in stamping (we used ALL my stamps from Art Gone Wild) to create some really beautiful pages. I had just gotten the latest release of stamps in and was super excited to see how they liked them.

https://www.etsy.com/listing/224962091/catherine-scanlon-designs-daisies-cling?ref=shop_home_active_8

Turns out, they loved them which made me super happy. You can find them in my Etsy shop, just follow the link at the top of the page.


We had plenty of time to learn lettering styles, how to work with different mediums and each student stamped and created TONS of pages to work with after the workshop.

  
It was go great to see them creating using my stamps, and I honestly was super inspired by each and every person.

We had such a great time that we are already planning the next event! Stay tuned Abington friends, we've got some crazy fun things on the horizon to share with you!


Thanks for dropping by, have a LOVELY day.

Friday, March 6

My Artful Life Planner: February Pages

Good Morning and HAPPY Friday! And....welcome to March. Wow, where has the first 2 months of the year gone? It's like I blinked and it's March 6th. Crazy.

Since it is the beginning of March I wanted to share my Artful Life Planner Pages with you. These are the pages I worked on during February.


The page on the left, in the photo above is one that was included in the planner. (You can also find a stamp with the same floral design here.) When I had finished coloring the flowers in I thought the page looked a little lonely, so I drew some greenery in the background with a pencil and added some subtle color with a pale green marker. It was the perfect touch. 

The page on the right in the same photo was an experiment, stay tuned for a blog post about it next week. I think you're going to love the simplicity and ease of how it came together using just two super cool products.


My Artful Life planner includes plenty of white space for notes and lists, but I create lists somewhere else and use the pages for my favorite quotes and little doodles. Here's the colored in version I created for February.


And this is the page I prepped to add color to in March. I'll create another grid page or similar type black and white sketch in March to color for April. I love having little blocks to color that I can complete in no time when I have 5 or 10 minutes here and there.

If you are interested in purchasing My Artful Life Planner I have two options for you. You'll find one completed planner in my Etsy shop - that's been discounted from $55.00 to $30.00. It is already assembled and has a cover with original art on it, find it on this link. Or, you can purchase the download from my website that comes with a Free On-Line class showing you how I put my planner together, which is what Tina Walker did with her planner.

Speaking of Tina, check out her pages this month over here. I'm always super excited to see how she creates her pages each month.

Well, thanks for dropping by. I'll see you next month with my March pages! Have a great day and ENJOY your weekend.

Wednesday, March 4

Positivity Journal #2

I've been trying to get back in the groove of creating art in my journals in the mornings and evenings. Not sure why I stopped, but I realized I was spending much more time on my iPad then creating and have made a big effort to put that thing down and pick up the stamps and markers.


I have had quite a few people ask me how I created this page so I thought I would share the process, which was inspired by a student at a workshop I taught a few weeks ago.

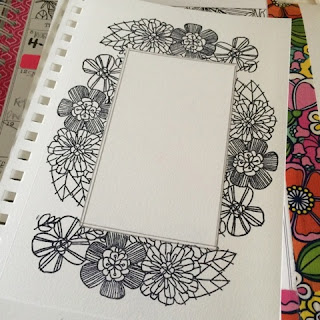
First, I started with a 5 1/2 x 8 1/2 Journal Page (canson or strathmore) and put a post it note in the center. Then I stamped around it with a stamp from my Blossoms in Bloom set. It's the one on the far right in the image below.


As I stamped around the mask to create a frame, I overlapped the stamp on the post-it. Before I removed the mask in the center of the page I traced it to create a nice frame in the center.


Then it just needed color and a quote and it was done.


I do like the way it turned out.

Thanks for dropping by today, have a great day!

Monday, March 2

Merrymeeting Art House February Art Camp

The week before last I was honored to have TWO full days of classes with two different groups of girls at Merrymeeting Art House.

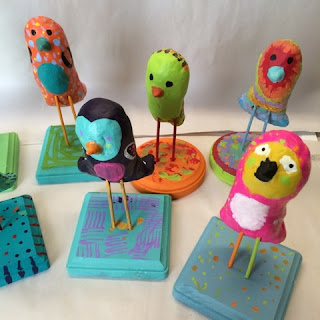
We played with paper clay and created these fun birds on skinny legs.


The girls were all so cute and the color choices were amazing. Each bird was named and had a sweet and fun personality. One girl names her bird Warthog, which totally cracked me up.


They also made a little letter plaque to hang in their rooms, I shared a tutorial with you a few weeks ago. Here's my demo for the second camp day. Both groups were so talented and fun to be around. I was thankful for a great helper with the younger group too!

I think that it's pretty amazing to watch kids create, I do see there is a fine line of when they start being critical of their work. The first group of girls were 7 to 9 and they were open and free and enjoyed the process with nary a word about their project being ugly or not good. The second group of girls were in 5th grade and I noticed just a little bit of self-criticism creeping in for a few of them. I did break my heart, but I firmly believe that if I can help them NOT go there, then my job is done.

I am already planning out projects for the April camp! Have a great day, thanks for dropping by.