

For me -- I will USE anything that has color -- as long as I like the colors. I love color. AMEN. And really, what's not to like about all the Spray Inks out there? One of the things I like about the Chalkboard Spray by TA is that it's flat and doesn't really have a lot of glimmer to it. Sometimes the glimmer can get in the way when I'm using it as a paint vs. a spray - plus I like to use the glimmery colors as an enhancement when I'm done.
I start my paintings and art journals pretty much the same way - I draw a design on watercolor or Mixed Media paper using a pencil. When I'm satisfied with the results I start painting. I try not to be real sketchy but use strong, determined lines. I don't usually pick the colors first -- but sometimes I will pull out some pretty colors I might like to work with. It's a hit or miss though -- I just use what I'm drawn to.
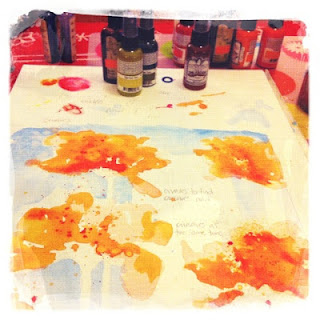
When I am painting with spray inks I work with the top off of one color at a time -- to prevent accidents. I'm pretty accident prone and spills on the coffee table aren't on the top of my fun list at midnight -- LoL! So to start, I take the cover off of the jar and put the sprayer in my water bucket and dip my paintbrush right into the jar of ink. I can mix up the spray with my brush or choose to use just the color on the top.

Then I start layering the colors for the focal points - which just so happens to be poppies on this one. I start with the lighter colors first and build to the brighter and darker colors -- making sure to leave some areas light.


You can see how that works -- layering light then darker and darker -- really gives the look of traditional watercolors AND creates a dynamic and textural painting.
I just keep layering and splattering and maybe a little spritz here and there to liven things up.
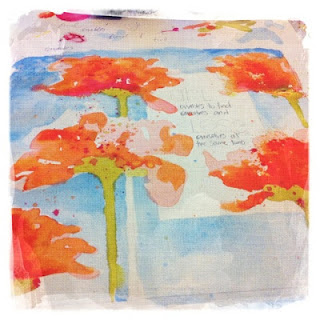
Once the flowers are done I add the greens (Chalkboard Sprout and Clover I think).
I also used some Icicle Glaze and splattered it here and there to create some lovely glistenings of water.
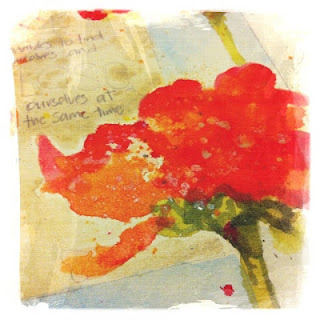
When that's done I add some browns here and there and in the part where the quote will go to tone some of the colors down.
NOTE: I always test the colors out on a part of the paper that will be cut off or won't show to see how they look before I use them. Sometimes they look a little different than what I had in mind and I throw them back and choose a different color.

I just keep layering and splattering and maybe a little spritz here and there to liven things up.

Once the flowers are done I add the greens (Chalkboard Sprout and Clover I think).

I also used some Icicle Glaze and splattered it here and there to create some lovely glistenings of water.

When that's done I add some browns here and there and in the part where the quote will go to tone some of the colors down.

Before you know it the color is done. Now it just needs to DRY completely.

When it's dry I go in with a black pen and add the details marks.

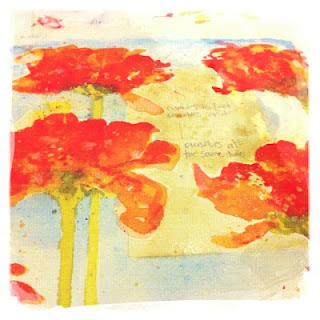
Sometimes, but not in this case -- I'll add texture with colored pencils or watercolor crayons. Just to liven things up and add more texture.

Then, when it's done you have a beautiful piece of art that you can frame and enjoy!
The colors I used for this painting are:
- Chalkboard: Inchworm, Chalk, Sprout, Ruby Slipper, Splash, Polka Dot Pink, Sandy Beach, Alaskas Salmon, Valencia and Clover.
- Simply Sheer: Rosey, Fresh Orange, Pink
- Glaze: Icicle
That's pretty much it. Thanks for stopping by today -- gave a GREAT weekend!
Oh this is so gorgeous Catherine. The design, the painting and the colours, all fabulous!
ReplyDeleteThank you for listing the colours you used. I want to get some of the Chalkboard Sprays and these colours look wonderful together. I am having a great weekend spraying too!
Hi Jennie - thanks and glad you liked it. I love the Chalkboard sprays for this a LOT better than traditional glimmer mist -- it feels like it has more color!
DeleteHave a great weekend!
I don't feel like this answered what it seems to me would be normal questions - what kind of brush do you use? Do you just dip it into the bottle? Do the colors run together like watercolors? Everyone says Glimmer Mists are water soluble, but I had about five colors before I started making my own, and they didn't reactivate with water or each other at all. When you "splatter" them, how do you do that? With a brush? Toothbrush? Just pull the cap out and flick it? Do you add water to them, like you would if they were normal watercolors? Or just use them straight out of the bottle? Do they react differently on different papers?
ReplyDeleteGreat questions -- thank you so much for visiting and thanks for asking them.
ReplyDeleteI use spray inks just like watercolor paint -- but they are already wet so I don't have to use much water. As I mentioned, I just take the cover off the jar and swirl the brush (the same ones I use for watercolor painting) inside to pick up the color.
I do agree, they don't reactivate that much, but with some water and gentle scrubbing on watercolor paper they can be lifted a little. They do act a lot like watercolor paints -- but because they are a solid color and not picked up from the pan you don't have those subtle variations that you get from painting with true w/c. I really haven't studied how they react on different papers, but I'd love to know if you find yourself experimenting.
O.K I'll see if I can post a comment again. For some reason I'm having technical difficulties again.
ReplyDeleteThanks for sharing your process of creating this gorgeous painting. I love the colors you used. Normally I don't care for splattering but in this case it really adds to this painting.
I make my own glimmer and color mist but it looks like I am going to have to put chalkboard spray mist on my ever growing wishlist.
Have a great weekend. What is left of it.