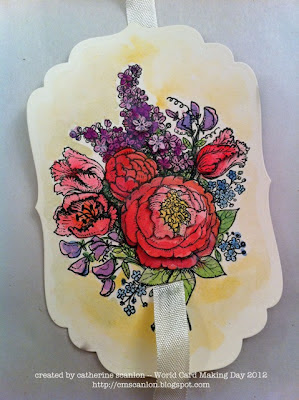
Hello and welcome to World Card Making Day 2012! Today I've got quite a few things to share with you -- a few techniqie things and then my completed card.
For those of you new to my blog, I like to make artsy fartsy cards -- with techniques like watercolor painting, sewing, sanding, embossing...to name a few. Today I have prepared a stamped image and I wanted to show you how I made my own "Grand Adhesions" design using supplies I already had on hand.
First, I stamped my image from Flourishes on cream cardstock 4 times using black Staz-On ink. Then I used my Koi Watercolor palette to paint each image -- the one that I would use for the background was painted completely and select flowers were painted on the other 3 images.

When they were all dry, I cut out different layers of each flower and used Foam Tape to layer the elements to create my own layered embellishment from card stock.

I used Coredinations Sandable Cardstock -- black with a pink core, and embossed a cool design -- this is what it looked like after I trimmed and sanded it. I layered the embossed mat on top of a piece of pinkish patterned paper from Ruby Rocket.

I wanted to make the bouquet look like it had a pretty bow around the base of it, so I used a blade to cut a slit in the painted design that I could put a piece of ribbon through.
I made sure to cut the ribbon long enough to wrap around the entire length of the card AND tie a TRIPLE bow. Next I attached my pretty embellishment on the embossed cardstock.


And evened up the ends. To tie the bow, I made sure to start it as close to the slit in the card as possible. This would make sure it looks like a bow wrapped around the flower stems.
To make the little tag, I stamped a sentiment on the cardstock and cut it into a strip. To give it that pennant look on the end I stuck the end of the tag in a square punch and punched the corner of a square -- it's a good idea to mark the center of the tag with a pencil and line up the corner of the square with the pencil mark.

The tag, tied on to the center of the bow. Almost done!

The last thing I did for this card is stitch around the edge of the die-cut and also around the edge of the card with my sewing machine!

The last thing I did for this card is stitch around the edge of the die-cut and also around the edge of the card with my sewing machine!
Here's the completed card. I think my sweet friend is going to love it!
Thanks for joining me today for my FREE World-Cardmaking Tutorial -- if you liked this you might like my class, Artful Cards at My Creative Classroom. It's starting October 26th and is FULL of useful cardmaking techniques like this!
Enjoy the rest of your weekend!


wow stunning Catherine, just so vibrant and pretty...love love your card.
ReplyDeletehugs, Peggy Lee
Gorgeous card...such detail...thanks for the tutorial!
ReplyDeleteBeautiful...I love the detail and the colors.....thank you for sharing.....
ReplyDeleteAbsolutely gorgeous!
ReplyDeleteAbsolutely gorgeous!
ReplyDeleteI prefer to use silicon myself but it is stunning